SpringSecurity整合JWT(四)-創(chuàng)新互聯(lián)
一、前言
本篇文章將講述Spring Security 簡單整合JWT 處理認證授權(quán)

- spring-boot 2.1.8
- mybatis-plus 2.2.0
- mysql 數(shù)據(jù)庫
- maven項目
- SpringBoot集成Spring Security入門體驗(一)
https://blog.csdn.net/qq_38225558/article/details/101754743 - Spring Security 自定義登錄認證(二)
https://blog.csdn.net/qq_38225558/article/details/102542072 - Spring Security 動態(tài)url權(quán)限控制(三)
https://blog.csdn.net/qq_38225558/article/details/102637637
二、 Spring Security 簡單整合 JWT
有關(guān)JWT不了解的可以看下官網(wǎng)文檔:https://jwt.io/introduction/
1、引入jwt依賴
 <!-- jwt依賴: https://mvnrepository.com/artifact/io.jsonwebtoken/jjwt -->
 <dependency>
     <groupId>io.jsonwebtoken</groupId>
     <artifactId>jjwt</artifactId>
     <version>0.9.1</version>
 </dependency>
2、在Security登錄認證成功后生成jwt令牌返回給前端保存
jwt生成令牌代碼如下:
// 生成jwt訪問令牌
String jwtToken = Jwts.builder()
        // 用戶角色
        .claim("ROLE_LOGIN", "ADMIN")
        // 主題 - 存用戶名
        .setSubject("張三")
        // 過期時間 - 30分鐘
        .setExpiration(new Date(System.currentTimeMillis() + 30 * 60 * 1000))
        // 加密算法和密鑰
        .signWith(SignatureAlgorithm.HS512, "helloworld")
        .compact();
這里貼出小編文末案例demo源碼中關(guān)于登錄認證處理中的使用
@Component
public class AdminAuthenticationProvider implements AuthenticationProvider {

    @Autowired
    UserDetailsServiceImpl userDetailsService;
    @Autowired
    private UserMapper userMapper;

    @Override
    public Authentication authenticate(Authentication authentication) throws AuthenticationException {
        // 獲取前端表單中輸入后返回的用戶名、密碼
        String userName = (String) authentication.getPrincipal();
        String password = (String) authentication.getCredentials();

        SecurityUser userInfo = (SecurityUser) userDetailsService.loadUserByUsername(userName);

        boolean isValid = PasswordUtils.isValidPassword(password, userInfo.getPassword(), userInfo.getCurrentUserInfo().getSalt());
        // 驗證密碼
        if (!isValid) {
            throw new BadCredentialsException("密碼錯誤!");
        }

        // 前后端分離情況下 處理邏輯...
        // 更新登錄令牌
        // 當前用戶所擁有角色代碼
        String roleCodes = userInfo.getRoleCodes();
        // 生成jwt訪問令牌
        String jwt = Jwts.builder()
                // 用戶角色
                .claim(Constants.ROLE_LOGIN, roleCodes)
                // 主題 - 存用戶名
                .setSubject(authentication.getName())
                // 過期時間 - 30分鐘
                .setExpiration(new Date(System.currentTimeMillis() + 30 * 60 * 1000))
                // 加密算法和密鑰
                .signWith(SignatureAlgorithm.HS512, Constants.SALT)
                .compact();

        User user = userMapper.selectById(userInfo.getCurrentUserInfo().getId());
        user.setToken(jwt);
        userMapper.updateById(user);
        userInfo.getCurrentUserInfo().setToken(jwt);
        return new UsernamePasswordAuthenticationToken(userInfo, password, userInfo.getAuthorities());
    }

    @Override
    public boolean supports(Class<?> aClass) {
        return true;
    }
}
前端頁面保存的jwt令牌格式如下: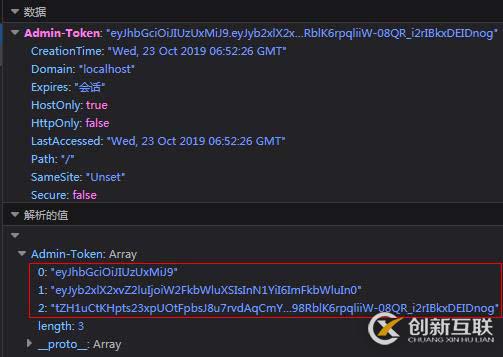
3、Security訪問鑒權(quán)中認證用戶信息
我們在訪問每一個url請求的時候,在統(tǒng)一認證的地方獲取jwt中我們需要的信息然后認證即可,【注: Claims 中存放著我們需要的信息】
例如: 我們可以將用戶名、密碼存放jwt中,然后在認證的時候讀取到其中的用戶信息,然后查詢數(shù)據(jù)庫認證用戶,如果滿足條件即成功訪問,如果不滿足條件即拋出異常處理
溫馨小提示:如果jwt令牌過期,會拋出
ExpiredJwtException異常,我們需要攔截到,然后交給認證失敗處理器中處理,然后返回給前端,這里根據(jù)個人業(yè)務(wù)實際處理即可~
// 獲取jwt中的信息
Claims claims = Jwts.parser().setSigningKey("helloworld").parseClaimsJws(jwtToken.replace("Bearer", "")).getBody();
// 獲取當前登錄用戶名
System.out.println("獲取當前登錄用戶名: " + claims.getSubject());
小編項目中認證過濾器中的使用如下:
@Slf4j
@Component
public class MyAuthenticationFilter extends OncePerRequestFilter {

    @Autowired
    AdminAuthenticationEntryPoint authenticationEntryPoint;

    private final UserDetailsServiceImpl userDetailsService;

    protected MyAuthenticationFilter(UserDetailsServiceImpl userDetailsService) {
        this.userDetailsService = userDetailsService;
    }

    @Override
    protected void doFilterInternal(HttpServletRequest request, HttpServletResponse response, FilterChain filterChain) throws ServletException, IOException {
        MultiReadHttpServletRequest wrappedRequest = new MultiReadHttpServletRequest(request);
        MultiReadHttpServletResponse wrappedResponse = new MultiReadHttpServletResponse(response);
        StopWatch stopWatch = new StopWatch();
        try {
            stopWatch.start();
            // 前后端分離情況下,前端登錄后將token儲存在cookie中,每次訪問接口時通過token去拿用戶權(quán)限
            String jwtToken = wrappedRequest.getHeader(Constants.REQUEST_HEADER);
            log.debug("后臺檢查令牌:{}", jwtToken);
            if (StringUtils.isNotBlank(jwtToken)) {
                // JWT相關(guān)start ===========================================
                // 獲取jwt中的信息
                Claims claims = Jwts.parser().setSigningKey(Constants.SALT).parseClaimsJws(jwtToken.replace("Bearer", "")).getBody();
                // 獲取當前登錄用戶名
                System.out.println("獲取當前登錄用戶名: " + claims.getSubject());
                // TODO 如需使用jwt特性在此做處理~
                // JWT相關(guān)end ===========================================

                // 檢查token
                SecurityUser securityUser = userDetailsService.getUserByToken(jwtToken);
                if (securityUser == null || securityUser.getCurrentUserInfo() == null) {
                    throw new BadCredentialsException("TOKEN已過期,請重新登錄!");
                }
                UsernamePasswordAuthenticationToken authentication = new UsernamePasswordAuthenticationToken(securityUser, null, securityUser.getAuthorities());
                // 全局注入角色權(quán)限信息和登錄用戶基本信息
                SecurityContextHolder.getContext().setAuthentication(authentication);
            }
            filterChain.doFilter(wrappedRequest, wrappedResponse);
        } catch (ExpiredJwtException e) {
            // jwt令牌過期
            SecurityContextHolder.clearContext();
            this.authenticationEntryPoint.commence(wrappedRequest, response, null);
        } catch (AuthenticationException e) {
            SecurityContextHolder.clearContext();
            this.authenticationEntryPoint.commence(wrappedRequest, response, e);
        } finally {
            stopWatch.stop();
        }
    }

}
簡單的入門使用就是這樣了
三、總結(jié)
- 引入
jwt依賴 - 登錄系統(tǒng)成功后
生成jwt令牌返回給前端保存到瀏覽器請求頭中 - 在每一次請求訪問系統(tǒng)url時,在統(tǒng)一認證過濾器中獲取到請求頭中jwt令牌中保存的
用戶信息然后做認證處理,如果滿足條件成功訪問,如果不滿足交給認證失敗處理器返回指定內(nèi)容給前端
本文案例demo源碼
https://gitee.com/zhengqingya/java-workspace
另外有需要云服務(wù)器可以了解下創(chuàng)新互聯(lián)scvps.cn,海內(nèi)外云服務(wù)器15元起步,三天無理由+7*72小時售后在線,公司持有idc許可證,提供“云服務(wù)器、裸金屬服務(wù)器、高防服務(wù)器、香港服務(wù)器、美國服務(wù)器、虛擬主機、免備案服務(wù)器”等云主機租用服務(wù)以及企業(yè)上云的綜合解決方案,具有“安全穩(wěn)定、簡單易用、服務(wù)可用性高、性價比高”等特點與優(yōu)勢,專為企業(yè)上云打造定制,能夠滿足用戶豐富、多元化的應(yīng)用場景需求。
名稱欄目:SpringSecurity整合JWT(四)-創(chuàng)新互聯(lián)
分享鏈接:http://www.jbt999.com/article16/dseigg.html
成都網(wǎng)站建設(shè)公司_創(chuàng)新互聯(lián),為您提供定制開發(fā)、App設(shè)計、移動網(wǎng)站建設(shè)、Google、虛擬主機、網(wǎng)站設(shè)計公司
聲明:本網(wǎng)站發(fā)布的內(nèi)容(圖片、視頻和文字)以用戶投稿、用戶轉(zhuǎn)載內(nèi)容為主,如果涉及侵權(quán)請盡快告知,我們將會在第一時間刪除。文章觀點不代表本網(wǎng)站立場,如需處理請聯(lián)系客服。電話:028-86922220;郵箱:[email protected]。內(nèi)容未經(jīng)允許不得轉(zhuǎn)載,或轉(zhuǎn)載時需注明來源: 創(chuàng)新互聯(lián)
猜你還喜歡下面的內(nèi)容

- 商城網(wǎng)站如何設(shè)計-深圳網(wǎng)站建設(shè)分享 2021-06-08
- 商城網(wǎng)站都有哪些功能,網(wǎng)上商城的功能模塊有哪些? 2022-11-11
- 商城網(wǎng)站建設(shè)開發(fā)策劃書 2023-05-05
- 怎樣提升商城網(wǎng)站 方式有什么 2016-11-16
- 商城網(wǎng)站制作的注意事項體現(xiàn)在三大方面 2021-03-24
- 商城網(wǎng)站建設(shè) 配色類別值的注意 2016-12-16
- 建設(shè)服裝商城網(wǎng)站的優(yōu)勢有哪些 2021-05-04
- 如何提升小程序商城的購買率? 2014-04-01
- b2b2c多用戶商城系統(tǒng)的盈利模式有哪些?看完這個你就懂了! 2015-08-13
- 手機商城網(wǎng)站開發(fā)有哪些好處? 2022-07-19
- 商城網(wǎng)站可延展功能賞析 2023-03-10
- 怎么挑選商城網(wǎng)站建造方法 2023-02-03